
Watching a seasoned lifter execute a set of Glute-Ham Raises (GHR) can be deceptive. The movement appears fluid, almost graceful, as they descend into a parallel position and pull themselves back to vertical with seemingly effortless control. However, for the uninitiated, the GHR is often a lesson in humility. Many beginners approach the machine only to find themselves "crashing"—losing tension, collapsing at the hips, or putting undue stress on their lower back.
The secret to unlocking the GHR—arguably the premier movement for posterior chain development—is not found in the strength of the hamstrings alone, but in the precision of the setup. Success is determined before the first rep even begins.
The Foundation: Why Setup Dictates Performance
In the world of strength and conditioning, the Glute-Ham Raise stands as the gold standard for isolating the hamstrings, glutes, and calves. Unlike a leg curl, which isolates the knee joint, the GHR requires the hamstrings to function as both a knee flexor and a hip stabilizer.
Because GHR machines vary wildly—from commercial-grade platforms to DIY home gym setups—the variables of footplate distance and pad contour can shift the mechanical demand of the lift. However, the biomechanical principles remain immutable: proper knee alignment, stable foot pressure, a rigid spine, and total body tension. If you ignore these, you are not performing a GHR; you are merely performing an awkward, ineffective version of a back extension.
Chronology of a Perfect Rep: A Step-by-Step Guide
To master the GHR, one must treat the setup as a ritual. By automating the physical check-ins, you eliminate the "fight" against the machine and allow your musculature to handle the load.
Step 1: The Precision of Positioning
The most common point of failure is poor limb length accommodation. If the footplate is too far away, you will feel trapped; too close, and you will lack the range of motion to properly engage the hamstrings.
- The Goal: Position your knees just behind the crest of the pad. This allows for a full, uninhibited range of motion.
- The Check: Perform a bodyweight test. Lean forward a few inches. If your knees feel as though they are sliding off the pad or if the pressure feels uneven, readjust the footplate immediately.
Step 2: Anchoring the Extremities
Your feet are your connection to the machine. Stability here determines force transfer. If your ankles are loose, your power output will leak, leading to a "grinding" sensation rather than a smooth pull.
- The Technique: Drive the balls of your feet into the plate as if you are attempting to push the machine across the floor. This "active" foot pressure forces the calves and hamstrings to fire instantly.
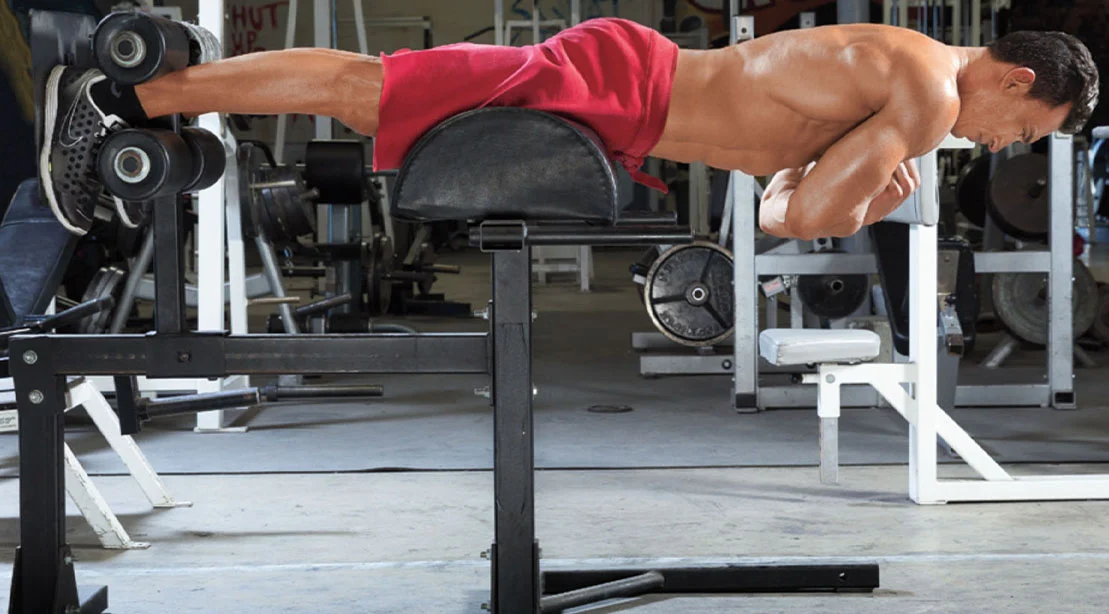
Step 3: Establishing the Kinetic Chain
The body must act as a single, rigid lever. From your head to your knees, there should be a perfectly straight line.
- The Fix: Imagine your torso and thighs are a steel rod. If you break this line, you lose the mechanical advantage necessary to move the weight. A quick visual check from a training partner can confirm if your spine is neutral or if you are "folding."
Step 4: Loading the Tension
Beginners often start "cold," hoping the hamstrings will engage once the movement starts. This is a recipe for disaster.
- The Strategy: Treat the GHR like a heavy deadlift. Before you move, take the "slack" out of the system. Squeeze your glutes, brace your core, and pull your heels into the pad. You should feel your hamstrings "light up" before you even begin the descent.
Step 5: Leverage and Control
Arm placement is a variable of difficulty. Crossing your arms over your chest is the standard, but it can be adjusted to suit your strength level.
- Advanced: Hands behind the head increases the lever arm, making the rep significantly harder.
- Assisted: If you are still building strength, using a resistance band or keeping your hands near your sides for a slight push-off is perfectly acceptable. The goal is to maintain tension, not to ego-lift.
Step 6: The Intra-Abdominal Brace
The core is the stabilizer of the posterior chain. If your ribs flare, your hips will drift, and your lower back will compensate.
- The Cue: Lock your ribs down toward your pelvis. Create a "canister" of pressure in your abdomen. If you cannot maintain this brace throughout the entire range of motion, your core is currently the limiting factor in your posterior chain development.
Supporting Data: The Biomechanics of the Posterior Chain
The efficacy of the GHR lies in the hamstrings’ dual role. Research indicates that the hamstrings are most effective at producing force when they are trained through both knee flexion and hip extension.
| Muscle Group | Primary Function in GHR |
|---|---|
| Hamstrings | Eccentric control and concentric knee flexion |
| Gluteus Maximus | Hip extension and pelvic stabilization |
| Erector Spinae | Isometric spinal stabilization |
| Gastrocnemius | Stabilizing the knee joint via foot pressure |
When these muscles work in unison, the GHR creates a hypertrophic stimulus that traditional isolation movements cannot replicate. By maintaining a rigid, straight-line posture, you ensure that the hamstrings are under constant tension, maximizing muscle fiber recruitment.
Official Coaching Perspectives and Common Failures
Experienced strength coaches universally agree: the GHR is a "skill" exercise. Even among elite athletes, the tendency to turn the GHR into a back extension is prevalent.
Error: The "Back Extension" Hybrid
This occurs when the lifter initiates the movement by bending at the lumbar spine rather than the knees. This shifts the load from the hamstrings to the lower back, increasing injury risk and decreasing hamstring development.
- The Fix: Visualize your body as a rigid board. The movement occurs only at the knee joint until you are near the horizontal position, where you then use the glutes to pull back to center.
Error: The "Hinge" Failure
When a lifter folds at the hips prematurely, the hamstrings are taken out of the equation.
- The Fix: Keep the ribs stacked. If you find your hips drifting back, it is a sign that your glutes have deactivated. Re-engage the posterior chain by consciously squeezing the glutes at the top of the movement.
Implications for Programming
Integrating the GHR into your program requires an understanding of its intensity. Because the GHR is taxing on the central nervous system and highly demanding on the hamstrings, it is best placed early in a lower-body session or as the primary "posterior chain" movement.
For most, 3 sets of 8–12 reps with a focus on a 3-second eccentric (lowering) phase is ideal. If you are struggling to reach the target rep range, do not hesitate to use a PVC pipe for balance or a band for assistance. The goal is not to complete the rep at all costs, but to complete it with perfect form.
Conclusion: The King of Hamstring Exercises
The Glute-Ham Raise is not merely a machine exercise; it is a discipline. It demands that you check your ego at the door, spend the necessary time on your setup, and prioritize tension over momentum.
By following the "Green Light" checklist—ensuring your knees are positioned correctly, your feet are anchored, your core is braced, and your body is aligned—you transform a frustrating, unstable movement into a powerhouse of strength. Master the setup, and the posterior gains will follow. Treat the GHR with the respect it demands, and it will, in turn, provide you with the strongest, most resilient hamstrings of your life.